Thursday, December 31, 2009

True Friends (January SOTM Blog Hop)


Welcome to our Stamp of the Month Blog Hop!  It's a brand-new year, and January's stamp-of-the-month (SOTM) from Close To My Heart is True Friends.  It is a set of 11 images with great sentiments to create a 'just thinking of you' card for a special friend.  There are also brackets and frames that can be used to add a little something extra to just about any stamping project.  If you have come here from Amy's 'Paisleys Playhouse' blog, you are on the right path!


There are over 60 Close To My Heart Consultants sharing their creations using this month's SOTM and other great CTMH products on their blogs.  Blog Hopping is simple to do - just click on the link at the end of the post on each blog to move to the next one! 


This quick and easy card was created using some of the papers from the new Topstitch paper packet.  Some Edge Anchors, Bigger Brads, and Sparkles were used to create the little flowers.  The self-adhesive Sparkles are one of my very favorite embellishments to use - they are so simple to use, and really add a nice finishing touch.  

And good news - the Bitty Sparkles that are used on the points of the stamped frame are now available to order, just $2.95 for a package of 100 of the 2mm size sparkles.  These teeny-tiny ones were always the first size that I would run out of from the package with four different sizes, so it's great that they can now be purchased separately.  

Now "Hop" on over to Kristie's 'Scrappin, Stampin, or Scrampin' blog to see her work!  Be sure to visit all the Consultants at their Blogs to get some great crafting ideas and other fun ideas!  Remember, the True Friends stamp set is only available until January 31!  Let me know if you would like to find out how you can get this stamp set at a discount or even free.

If you get lost on the Blog Hop or find links that aren't working, there is a complete list of all participating blogs on Jena's 'Live, Love, Laugh, Scrapbook!' blog.

post signature

Thursday, December 24, 2009

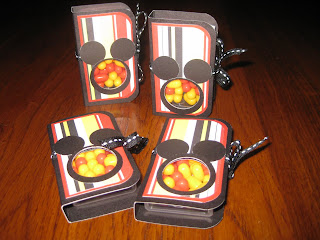
It's Mickey! (Tic Tac holders)


We made some cute little snowman Tic Tac holders at a Christmas card workshop this year, and they are really easy to make.  When I saw the idea that Tammy shared on her blog with a Mickey Mouse silhouette, I knew that I had to create some using the red and yellow Cherry Passion Tic Tacs.


So, I found some striped paper in appropriate Disney colors (retired Giggles & Grins paper from CTMH), punched some black circles, and created these little "hidden Mickey" holders.  Since Samantha and I are heading for Orlando (and Walt Disney World) on Sunday with the high school band, these will make a perfect little gift for our roommates. 

post signature

Sunday, December 20, 2009

Holiday Trinkets - Create Your Own Snow

An inexpensive and easy way to add the look of 'snow' to your cards and scrapbook pages is to use some glittery styrofoam balls.  Simply take two styrofoam balls and rub them together over a craft tray.  The craft tray will catch all the 'dust' that is scraped off the balls. 


This material is very soft and can be adhered onto your greeting card using any type of adhesive.  The consistency of the styrofoam 'dust' snow is the same as the colored Flower Soft products that are available at some scrapbook stores.

For this card using the Holiday Trinkets stamp set, glue was simply put on the edges of the stamped image and then the styrofoam 'snow dust' was added. The 'snow dust' gives some nice dimension to the card - and would be great for use as Santa's beard, or the cuffs of his suit and hat. 

I was lucky enough to find a slightly damaged package of glittery styrofoam balls at a local store.  The balls were not very uniform and had chucks out of them - but that was just fine for my purpose, since I was going to rub them together to create 'snow dust.'  The marked-down, damaged package was only $1.26, compared to $3.95 or higher for a package of styrofoam balls in "perfect" condition.

post signature

Friday, December 18, 2009

Felicity Collection - National Papercrafting Month


January is National Papercrafting Month and Close To My Heart is starting the celebration early by offering a stunning set of papers and stamps.  The collection features decorative die-cut paper, three gorgeous color schemes, and a D-size stamp set that includes flowers, flourishes, argyle patterns, birds, and an entire alphabet! 


  • 1 – My Acrylix® Felicity stamp set (D-size)
  • 2 – Autumn Terracotta Plaid B&T Duos® Paper
  • 2 – Autumn Terracotta Flourish B&T Duos® Paper
  • 1 – Autumn Terracotta Circle B&T Duos® Die-Cut
  • 1 – Autumn Terracotta Bracket B&T Duos® Die-Cut
  • 2 – Sorbet Dot B&T Duos® Paper
  • 2 – Sorbet Flourish B&T Duos® Paper
  • 1 – Sorbet Circle B&T Duos® Die-Cut
  • 1 – Sorbet Bracket B&T Duos® Die-Cut
  • 2 – Twilight Argyle B&T Duos® Paper
  • 2 – Twilight Stripe B&T Duos® Paper
  • 1 – Twilight Circle B&T Duos® Die-Cut
  • 1 – Twilight Bracket B&T Duos® Die-Cut 
  • 1 – Artwork Brochure (2-sided, full color, project ideas)
Five ways to get your Felicity collection:
  • $34.95 - purchase it at full retail price
  • FREE with an order of $60 or more in stamp sets
  • FREE with an order of $125 or more of any CTMH products
  • FREE to Hostesses with a party sales total of $400 or more
  • FREE with your New Consultant Kit if you join CTMH in January
This special collection is available through January 31, and only while supplies last.  Let me know if you would like to place an order, or visit the Shop Online section of my CTMH website (http://sheila.myctmh.com). 

post signature

Thursday, December 10, 2009

Fossil Stone Technique

The 'Fossil Stone' technique was featured in one the Technique Junkies newsletters a couple of years ago.  This is a surprisingly easy and fun technique that creates great backgrounds.


Start with a plastic file folder or page protector.  Using an ink pad, 'smear' some ink on the right side of the plastic.  Using a second color, 'smear' ink on the left side.  Optionally, you may dab a third color of ink randomly on both sides of the plastic.  Do not completely color the plastic with ink - just rub the edge of your ink pad in several places.  Be sure to leave open 'non inked' areas on each side so that when the folder is closed, there is open space for the different inks to be visible both on their own and mixed with the other inks.


Don't be fooled by the "apparent" lack of ink on the plastic.  Close the plastic (put both sides together) and then rub with your hands so that the ink mixes together and moves around a bit inside the plastic.


Open the plastic and place two pieces of Glossy White paper back-to-back (so that the Glossy is facing the inks) on top of the plastic on the right.  Then "close" the plastic by placing the left side on top of the right.  Using a Rubber Brayer, roll on top of the plastic to ensure that the ink is transferred to the Glossy paper.


Open the plastic and remove the Glossy cardstock.  You now have two 'unique' background to use for cards!  Okay, so a total of four pieces are shown here - results from doing the technique two times with two pieces of cardstock each time.


Experiment with different colors.  This sample uses Olive, Grey Wool, and Desert Sand.  Since the ink is not absorbed into the plastic and just sits on top, little air bubbles are created as the ink is 'floating' on the plastic.  This creates a 'fossilized' look when you transfer the ink to your Glossy paper.  This is a really great technique because you can use any dye ink pads you already own.  You do not need reinkers for this technique!


One thing that I’ve noticed.  Initially, the color is very bright and vivid on the Glossy cardstock – but after a day or so, the color does fade a bit.

Sunday, December 6, 2009

The Pioneer Woman Cooks

The Pioneer Woman Cooks: Recipes from an Accidental Ranch Wife The Pioneer Woman Cooks: Recipes from an Accidental Ranch Wife by Ree Drummond


My rating: 5 of 5 stars
This cookbook is such a joy to read - Ree (The Pioneer Woman) shares her personal life, her recommendations for basic kitchen tools, and wonderful step-by-step recipes with beautiful color photos - all along with her delightful sense of humor.

What I really like about her recipes is that they use "real" food - not a bunch of fancy stuff, but real ingredients that you are likely to have on hand and are easy to find in any grocery store. Since following her blog, we've prepared several of her recipes and everything is really good.

View all my reviews >>


One of our favorites is her Whiskey-Glazed Carrots - they are truly yummy. Even though this recipe isn't in the cookbook, it is available in the Cooking section of The Pioneer Woman blog. This is a picture of our first batch and as you can see, I even bought a cast-iron skillet so that I could prepare the recipes just as Pioneer Woman recommends. Even though I was dreading the cleaning of a frying pan without a 'non-stick' surface, I was pleasantly surprised at how easy it was to clean the skillet. Just run hot water over the pan and wipe with a nylon scrubber - easy, peasy clean-up. Be sure to dry thoroughly to prevent the iron from rusting.

Some of our other recommendations are Buttered Rosemary Rolls, Marlboro Man's Second Favorite Sandwich, and Chicken Spaghetti. Let me know if you have a favorite Pioneer Woman recipe!